What is Wondershare DemoCreator and Why Consider It
So, what exactly is Wondershare DemoCreator? It’s basically two tools thrown together – you get a screen recorder plus a video editor all in one package. I’ve found it’s pretty handy for people who aren’t video editing experts but still want their content to look decent.
Most people using it seem to be teachers making online lessons, YouTubers doing tutorials, gamers recording their playthroughs, and business folks doing software demos. If you need to show stuff happening on your screen, this might be worth checking out.
I’ve messed around with Camtasia before (costs more though), tried OBS (powerful but kinda confusing at first), and even Bandicam (records fine but editing options are pretty basic). DemoCreator sits somewhere in the middle – not too complex, not too simple.
Getting Started with Wondershare DemoCreator: Installation and First Steps
Getting DemoCreator onto your computer isn’t complicated – just go to Wondershare’s website and download it. Works on Windows and Mac, though some features might be a bit different depending on which one you use.
As for what your computer needs:
- A decent processor (quad-core is good enough)
- At least 8 GB RAM (go for 16 GB if you’re doing 4K stuff)
- Plenty of hard drive space – videos eat up storage fast!
- A proper graphics card helps if you’re recording games or high-res stuff
After you’ve got it installed, you should probably set up:
- What resolution you want to record in (I usually stick with 1080p)
- FPS settings – 30 works for most things, bump to 60 for games
- Keyboard shortcuts to start/stop recording – trust me, these save time
The Interface: Finding Your Way Around Easily
When you first open DemoCreator, it might look a bit overwhelming. But really, there are just three main sections you need to know about:
The Home screen shows your recent projects and some templates if you’re stuck for ideas.
The Recorder part is where you set up your recording settings – pick what area of your screen to capture, turn on your webcam if needed, select which mic to use, that kind of stuff.
Then there’s the Editor where you actually piece everything together after recording. This is where you’ll find the timeline, effects options, and track management.

You can move stuff around in the interface too – drag panels around until they make sense for how you work.
Recording the Screen Effectively with Wondershare DemoCreator
When it comes to actually recording stuff, you’ve got options:
You can record your entire screen or just a specific part of it. I usually go for the second option when doing tutorials since people don’t need to see my messy desktop.
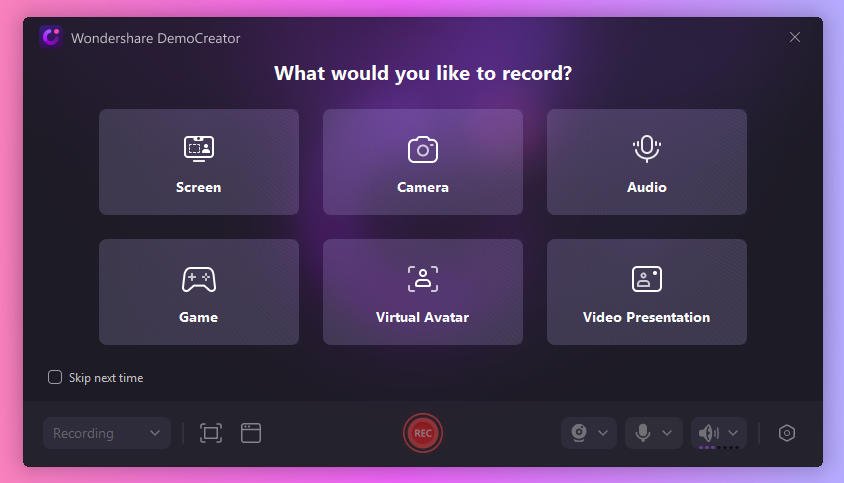
A pretty cool feature is recording your webcam at the same time as your screen. This puts a little video of your face in the corner, which adds a personal touch.
If you’re a gamer, there’s a special mode that helps with performance so your game doesn’t get all laggy while recording.
Some other useful recording tricks:
- Making your mouse clicks visible (shows little circles when you click)
- Picture-in-Picture to zoom in on important parts
- Setting up recordings to start automatically at certain times
Basic Editing Functions
Once you’ve finished recording, editing isn’t too hard:
Adding other videos, images, or audio is just drag-and-drop simple.
Cutting out mistakes is pretty straightforward – just split the clip, remove the bad part, and join things back together.
You can adjust brightness and colors if your recording looks too dark or washed out.
Adding text is super useful for tutorials – you can choose different styles and even make text appear with animations.
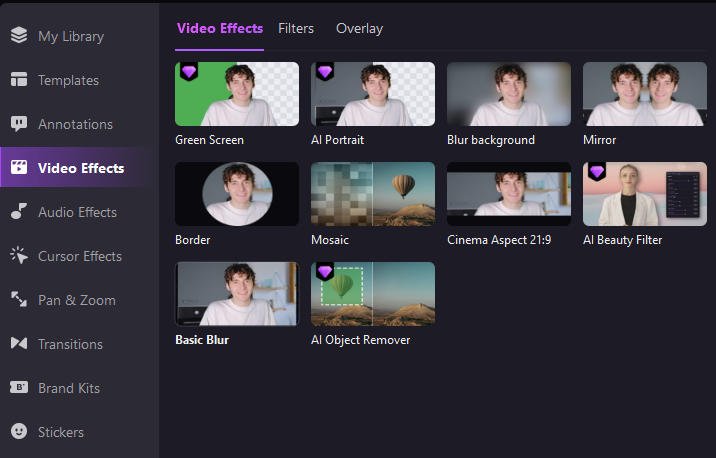
Effects and Animations for Dynamic Content
This is where DemoCreator gets a bit more interesting:
You’ve got transitions like fades and slides to make your video flow better between different scenes.
There are loads of stickers, GIFs, and overlays to make boring videos more engaging.
The green screen feature is pretty neat – it lets you remove your background if you recorded with a webcam.
You can do stuff like zoom in on important parts of your screen or create panning effects to guide viewers’ attention.
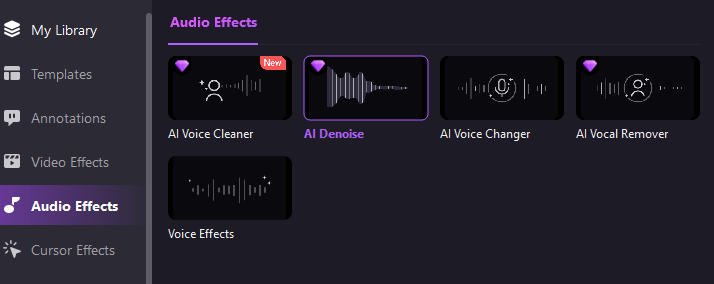
Professional Audio Management with Wondershare DemoCreator
Bad audio can ruin a good video, so these features come in handy:
You can clean up background noise and fix volume levels.
Adding background music is easy, and you can adjust how loud it is compared to your voice.
If you forget to say something during recording, you can add voiceover directly in the editor afterwards.
Exporting and Sharing
When you’re done with your project:
You can save videos as MP4s, MOVs, or even GIFs for short clips.
There are preset export settings for YouTube, TikTok, and other platforms.
For tech-savvy users, you can fiddle with advanced settings like bitrate and codecs.
Advanced Features and Practical Tips
Some other cool stuff worth mentioning:
You can create interactive quizzes – great for teachers making e-learning content.
Templates save tons of time if you make similar videos regularly.
Learning keyboard shortcuts might seem annoying at first, but they’ll make everything so much faster.
AI Features of Wondershare DemoCreator 8: An Overview
Wondershare’s DemoCreator 8 includes several artificial intelligence-based features that promise to simplify video creation. I’ve taken a look at the main innovations in this version and want to share what I found.
Automatic Subtitles with Animations
The new version offers both automatic subtitle generation and SRT file importing. This isn’t a particularly innovative feature, as many software packages now include it, but DemoCreator adds 30 animation styles for subtitles. I noticed that some of these styles are quite eye-catching, while others might be a bit too flashy for professional use.
Improved Text-to-Speech
DemoCreator 8 allows you to convert text to speech using more than 120 AI voices in over 10 languages. It works with simple texts, SRT/VTT files, or videos that already have subtitles.
The voices sound fairly natural, although sometimes you can still notice that typical inflection of synthetic voices, especially in less common languages. I tried Italian and, while usable, it still doesn’t achieve the fluidity of a human voice actor.
One useful thing is that if you record your voice, the software can generate subtitles and then convert them into another language. I encountered some inaccuracies in transcriptions of fast speech or marked accents, so it’s always better to double-check the result.
Video Object Removal
This is probably the feature that impressed me the most. The process is simple: you load the video, select the object to remove, and the software does the rest. I tested removing small elements like watermarks and logos, and it works quite well. With larger or moving objects, results are more variable – sometimes there’s a slight blur where the removed object was.
The software fills the empty space using surrounding pixels, and for static videos, it really works well. In videos with a lot of movement, however, some manual adjustments might be necessary.
AI Vocal Remover
Separating voice from background music has always been a problem in editing. DemoCreator 8 tries to solve this with a drag-and-drop function that separates the audio into two tracks.
It works decently with clean recordings, but I had mixed results with already compressed audio or recordings made in noisy environments. In some cases, part of the voice ends up in the background track and vice versa. It’s still a good starting point that significantly reduces manual work.
AI Voice Changer
The software offers more than 20 styles to modify voices. I tried converting my voice into several different styles, and the results were variable. Some effects still sound a bit artificial, while others are surprisingly convincing.
The process is simple: import the audio, apply the effect, and choose the style. I noticed it works better with good quality recordings and clear pronunciation.
AI Beauty Filters of Wondershare DemoCreator
DemoCreator 8 includes six preset filters to enhance people’s appearance in videos: Smooth Face, Whitening, Slimming, Wrinkle Removal, Contouring, and Natural.
I tested them on different subjects and found them quite effective, although sometimes they tend to be excessive and can give an artificial appearance. The Natural filter is probably the most useful for most users, as it applies subtle improvements.
The parameters are customizable, so you can adjust the intensity of each effect according to your preferences. With some practice, you can get quite natural results.
Wondershare DemoCreator Pricing
Wondershare DemoCreator currently offers three plans:
- A monthly license costing €12.99 per month, ideal for those who need temporary use;
- An annual license costing €69.99 per year;
- A lifetime license costing €99.99. It’s worth noting that the lifetime license includes updates for the same version you purchased (so if you bought version 8.1, you can get updates to version 8.90, but not to version 9.0). The monthly or annual license also includes upgrades to higher versions (for example, from 8.0 to 9.0). A trial version is also available, which you can download from here.
Conclusions and Use Cases
DemoCreator works best for:
- Making software tutorials where you need to highlight specific parts of the screen
- Creating video lessons that include both your face and presentation slides
- Recording gameplay with commentary
The main selling point is having everything in one place – recording and editing together – without being too complicated or too simple. It’s probably not for professional video editors, but it’s more than enough for most people who just need to create decent screen recordings.
Wondershare keeps updating it too, so it’s getting closer to the premium software in terms of features, without the premium price tag.